 |
 |
Home
Tools
Drilling and Fixing
Putting Things Up
Repairs/Maintenance
Plumbing
Electrics
Woodwork
Decorating a Room
Tiling
Safety & Security
Saving Energy
House and Finance
Health&Safety
Disclaimer
Contact
Advertising
Useful Links
Site Map
Intruder alarms |
|||||||||||||||||||||||||||||||||||||||||||||||||||||||||||||||||||||||||||||||||||||||||||||||||||||||||||||||||||||||||||
How to install a DIY intruder alarm in under 30 minutes.For many years, UK home-owners have left home security to the security professionals. While this may still hold true for some, a new breed of DIY minded folk are adopting smart technology, much of which is self-installed. Smart home security is booming! There's a whole range of DIY security systems available on the market. And we've tested many of them. One which stands head and shoulders above the rest is Home8 (in our opinion). Why? Because it's an intruder alarm plus CCTV in one, comes in at around £300, has no monthly contracts attached, works really well and takes less than 30 minutes to install. 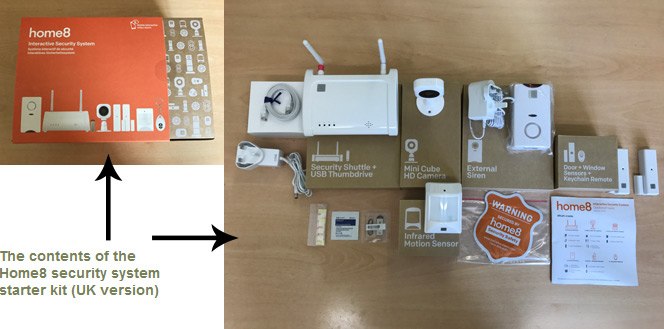 So, without further ado; here's a step by step guide to installing Home8.
|
|||||||||||||||||||||||||||||||||||||||||||||||||||||||||||||||||||||||||||||||||||||||||||||||||||||||||||||||||||||||||||
On your smartphone, make sure you have auto-lock disabled. To do this on iOS goto Settings > Display & Brightness > Auto Lock. Change this to "Never". To do this on Android go to the Settings > Display. In this menu, you'll find a Screen timeout or Sleep setting. |
 |
|
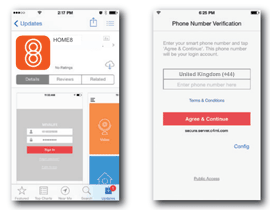
STEP 1 Download the Home8 app from the App Store or Google Play. Follow the on-screen instructions to set up your account. |
 |
|
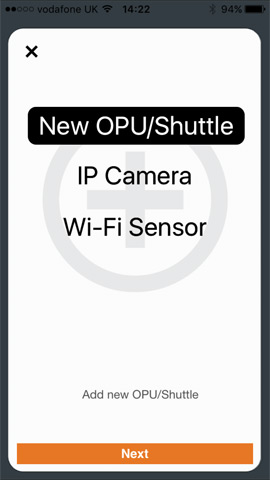
STEP 2 When you get to this screen (do not press 'Next' yet - skip to next step). |
 |
|
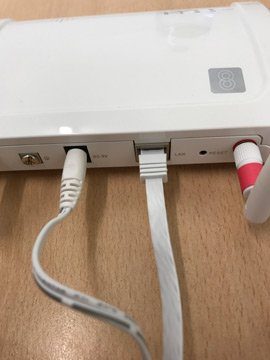
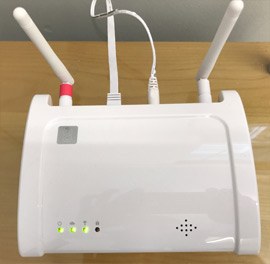
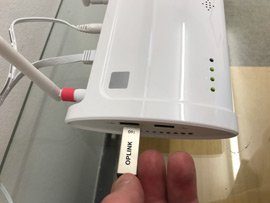
STEP 3 If you haven't already; plug the mains adapter and ethernet cable into the back of the main hub (referred to as OPU in manual and app). Plug the other end of the mains adapter into a wall socket, close to your router, and switch on. Plug the other end of the ethernet cable into a spare port on the back of your broadband router. |
 |
|
STEP 4 Wait for 1,2,3 LEDs to go green on OPU. It may take a few minutes for LED 2 (Cloud symbol) to go green. Please be patient. If LED 2 does not go green, switch off router, wait 30 seconds, then switch on again. After a few minutes, if LED 2 still does not go green, it means that router is not allowing home8 to connect to internet. This is common with BT Infinity, BT Homehub 5 routers. Please call BT, they will talk you through what needs to be done with router (or firewall) to allow this. |
 |
|
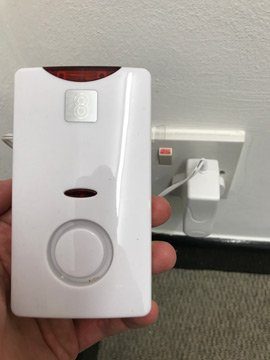
STEP 5 Plug siren into wall socket and pull plastic tag out from the side the engage battery. This is to ensure siren continues if mains is switched off. |
 |
|
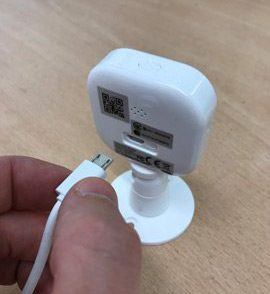
STEP 6 Connect the power lead into the back of the IP cube camera. Plug the other end into a wall socket and place close to the OPU. |
 |
|
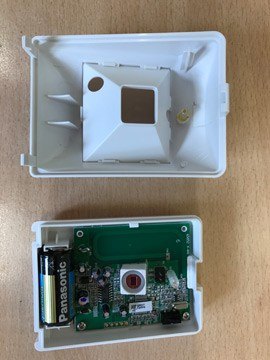
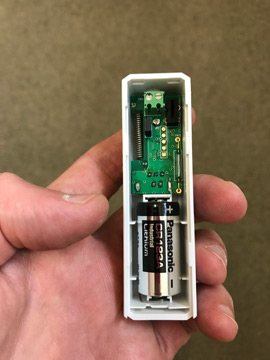
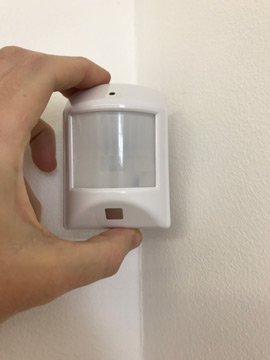
STEP 7 Open the back of the PIR motion sensor and add the CR123A battery (supplied), put back together and place within 2ft of OPU. |
 |
|
STEP 8 Do the same with the door contacts, remove back and insert battery. Put back together and place close to OPU. |
 |
|
STEP 9 Go back to the app (which should be exactly as you left it, as you disabled auto lock in step 1). Click the orange next button and follow on screen instructions. |
|
|
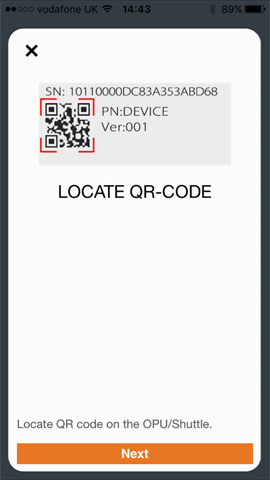
STEP 10 When you get to this screen the camera on your phone will automatically open. Simply focus it on the QR code, found on the bottom of the OPU. |
 |
|
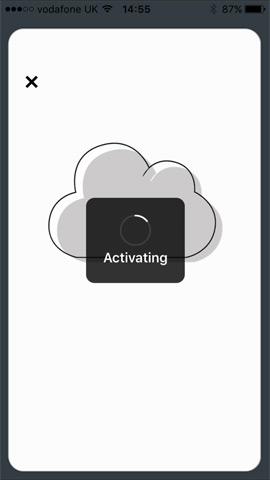
STEP 11 Activating System - usually take ~2 minutes. |
 |
|
STEP 12 System activated! You have already added batteries to sensors. Proceed by clicking next button through the system tutorial screens. |
 |
|
STEP 13 When you get to this screen, click OK then go fit your sensors in to position. Before actually fixing the sensors(door contacts and PIRs), to desired fitting location, hold in position (roughly) and remove the back (as if accessing the battery). This will activate the tamper switch and, assuming the sensor is within range, will notifiy you on the app. Assuming you do get the tamper notification, proceed and fit the sensor. The range is ~90m, so this should be fine for most households, unless your property has lead lined walls. If it's not within range, and you can't move the location of the OPU, there are range boosters available. |
 |
|
STEP 14 Stick the double-sided 3M tape to the 45° angled sides of the PIR motion sensor. The sensors come provided with both 3M tape and raw-plugs and screws. For most surfaces tape should do the job. Surfaces like brick would require fixing with raw-plug and screw. |
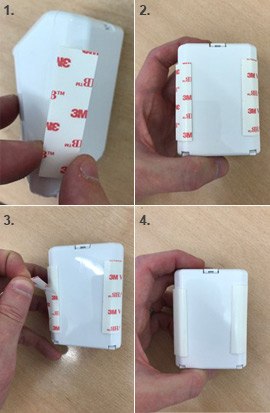 |
|
STEP 15 Ensure the surface you're sticking to it clean from dust, grease, dirt and cobwebs. Position the sensor in corner of the room, at ceiling height, ideally 1.7m - 2.2m high. Once fitted, the PIR goes into 'test mode' for 1 hour where it learns its environment. After 1 hour, the PIR goes into 'normal mode' where it can detect movement. However, to conserve battery life, the PIRs have a 3 minute cool-down period, after each trigger meaning it will ignore movement until cool-down period has elapsed. |
 |
|
STEP 16 Using the alcohol wipe provided, clean the door frame and door before fitting the sensors. Fit the contact to the door frame and the magnet to the door (if possible, although it will work both ways). Before sticking in final position, offer the two parts up in desired location and see red LED light up so ensure your magnet is the correct side and end of the contact. For door and window frames which have a significant difference in height to the door or window, there's a spacer provided, which clicks into the magnet housing to help reduce the difference.
|
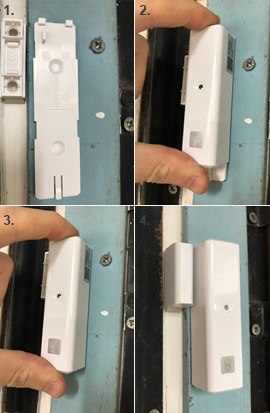 |
|
STEP 17 Fitted the preferred way, with contact on the door frame and magnet on the door. |
 |
|
STEP 18 Ensure the USB memory card is plugged into the side of the OPU. |
 |
|
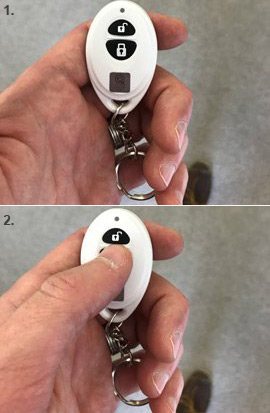
STEP 19 Use the keyfob to arm/disarm the system or, of course, the Home8 app. |
 |
|
 STOP THE CLOCK!
There you have it... in under 30 minutes you can install a DIY alarm, which connects to a secure app, which alerts you if your alarm is triggered. Once triggered the IP camera(s) start recording 30 seconds of LIVE video, which is available to view on the app.